How to plan an EPIC Mario Themed Birthday Party - DIY projects and inspo!
- Liss McKenzie

- Oct 10, 2022
- 7 min read
Updated: Apr 6, 2025

Party planning and DIY has always been a passion of mine. I attribute this to the fact that my mother was the ultimate Martha Stewart type growing up and would host several theme parties each year. She instilled in me a love for creativity and design, art and crafting!
When it came time to plan my 5-year-old son's birthday party, I was surprised that he requested a LEGO Mario theme - something that he only recently discovered on YouTube. He's been obsessed with LEGO for quite some time but had recently started watching videos of kids playing with the Mario LEGO and building different worlds from the video games. His dad was thrilled to then introduce him to Super Mario games. He became fascinated with all the different Mario characters, levels and games, so when I started doing some research on Pinterest, I was so excited to see so many fun ideas and couldn't wait to put them into action.
My mom and I DIY'd every piece of this party, from the backdrop to the props the food and entertainment. Below you will see some photos for inspiration and brief instruction on how to pull it off yourself!
Quick Links:
Party Details
Mario Photo Back-drop
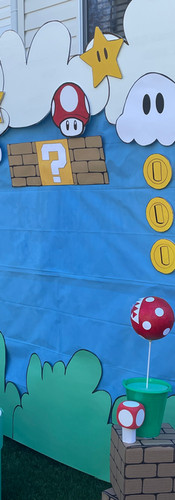
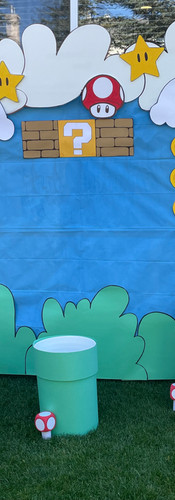
The backdrop is built with pvc pipe from your local home improvement store, a large sheet of painted paper, green and white Bristol board, cardboard and painted foam core sheets. My mom hand drew, painted and cut each element by hand and glued them together using a glue gun! She is so talented.
Photobooth props;
Bricks - these were just cardboard boxes with sharpie bricks drawn on all sides.
Mushrooms - when I saw these little red dice with white dots I immediately thought of the mushrooms so we cut toilet paper rolls and use a glued gun to attach the stems.
Bob-ombs (Bomb-Bombs) - these were Styrofoam balls painted black with white and yellow cardstock for the eyes, feet and cranks. The tops were made from tea light candles and red yarn. Again, everything was attached using a glue gun.
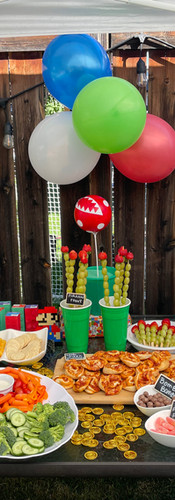
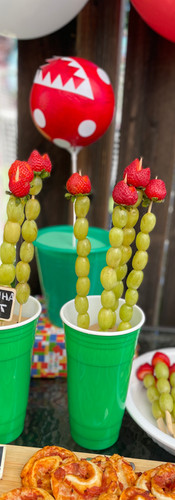
Piranha Plants - we did two sizes for the party. These small ones are using Styrofoam balls painted red, white cardstock teeth and spots attached with a glue gun and balloon sticks glued to the bottom of a green plastic pail.
Warp pipes - these were made from 5 gallon pails covered with green Bristol board from the dollar store. I actually got these pails from a local ice cream shop!
Additional Decor/props:
Large Piranha Plants - I made two large piranha plants to sit inside a couple of the warp pipes. These were made with red Bristol board, white foam sheets, metal poles and plenty of tape and hot glue.

Yellow Blocks - these were small cardboard boxes (from staples) wrapped in yellow paper with white question marks glued on top. We cut holes on the bottom and covered with tissue paper so the kids could easily punch through them as part of the obstacle course.

Chain chomp - a black balloon with red cardstock and white foam glued on (no hot glue on balloons, just basic glue stick here) for the mouth and eyes. The chain was made from black foam sheets cut into strips and stapled together.

Goombas - these were just dark brown balloons with plastic coins inside. We used a glue stick to attached paper faces that we printed from a website here.

Balloon arch - this is a staple at all of our parties. We find it easiest to use a tent poll (from our camping tent) zip tied to the side of our pop-up tent (this is from a local hardware store and has been so helpful for blocking sun and rain during outdoor events). We invested in this small air pump which makes blowing up the balloons so much quicker/easier. My parents tied these together in groups of two and then twisted them around the tent poll. We added two foil balloons with eyes drawn on with a sharpie to add to the Mario theme.

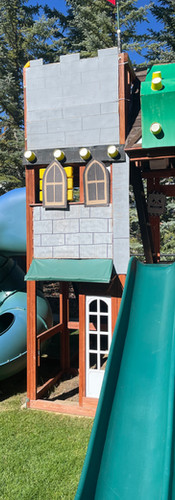
Bowser Castle - this was actually my son's idea, and I love how it turned out! We had recently purchased some office furniture so we had some large pieces of cardboard laying around. I painted these green and grey and then drew on the bricks with sharpies. I found these yellow cups at the dollar store and used a glue gun to attached them onto the green piece. Then we used a staple gun to attach the pieces to our outdoor playcenter (this one is from Costco, we love it!). The windows were also just painted pieces of cardboard stapled onto the side of the playcenter.
Boos - these were made from white paper lanterns and black/red card stock stuck on with a hot glue gun. We hung these with some string to the swingset at different heights. The wind blew them around making the perfect obstacle for the kids.
Thwomps - my mom hand drew/painted these on white foam core and cut them out with an exacto knife. We stapled these to the side of the playhouse in a few areas that the kids would see them.
Bowser costume - my husband was such a good sport acting as Bowser to entertain the kids. He took a good beating of water balloons as the final level of our obstacle course. His costume was made with a yellow oversized jersey I found at a secondhand store, a turtle shell which was once part of a ninja turtle costume stuffed with a pillow) and yellow paper cups stuck on with a glue gun. I made the hat by cutting out colored foam sheets and sticking them on an old Viking helmet with a glue gun.
Entertainment
Mario-themed obstacle course - we wanted the kids to feel like they got to play a level of Mario (even though many of them had never heard of the game!), so we created an obstacle course in our backyard. We handed them each a small gift bag where they could collect their coins for achieving each part of the level. There were two types of coins - plastic 'pirate treasure' and chocolate loonies from the dollar store. I had a bowl of the chocolate coins that I would give each child as they moved through the course.
Obstacle course elements:
Jump over the brick wall - we lined up some brick boxes and they had to jump overtop
Goomba Stomp - the goombas had coins inside that the kids could collect once they popped them
Brick punch - the yellow bricks had holes cut in the bottom and a slit on top. We taped yellow tissue paper to the bottom so the kids could easily punch through to collect their coin. These were replaced each time a group of kids completed their turn.
Tunnel crawl - they had to crawl through a tunnel under the stairs to get to the second part of the level.
Chain chomp chase - another quick jump over a bench made to look like bricks with a chain chomp glued to the side.
Piranha toss - these large piranha plants had enough space that they kids could try to land a bean bag on the top.
Avoid the boos - the wind made our paper lantern boos swing around so the kids could make their way through the line of boos to get to their next challenge.
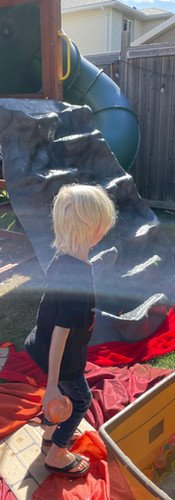
Lava jump - we lined the grass with red and orange sheets to create lava leading up to Bowser's castle. We had cardboard brick platforms punched into the grass so they could hop through to get to the water balloon station and defeat Bowser.
Bowser bombs - they had to hit bowser with three water balloons before they could climb the rock wall and turn the flag
Turn the flag - they had to turn the flag from the Bowser side to the Mario side to complete the level!
Lego Pinata - there were only a few elements that really spoke to the Lego component of this theme and the pinata was one of them. We found this brick pinata at the dollar store and filled it with treats, light sticks, chocolate coins, small lego sets, tattoos, stickers and other small toys. We started and ended with the birthday boy, but let each kid have a swing at the pinata going in order of youngest to oldest. The kids collected their prizes in their small lego gift bags that they had from the obstacle course.

Food:
I wanted to keep the food simple, and things that I knew the kids would all like to eat. The party ran from 1pm-4pm so it was in between meals, and so I went with a mix of snacks and treats without having to worry about a full meal. The theme made it so easy to come up with fun ideas to fill our table.
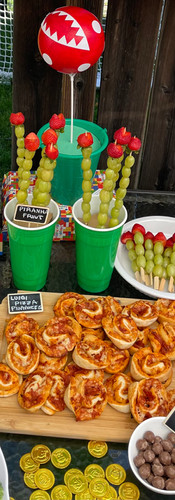
Piranha fruit - simply grapes and strawberries on skewers. I displayed these in some plastic solo cups I found at the dollar store (they looked like mini warp pipes).
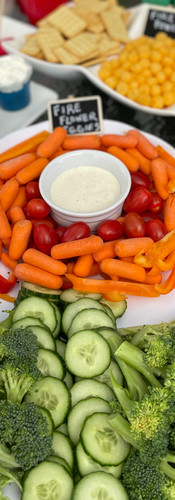
Fire flower veggies - all our favorite veggies arranged on a large platter in the shape of a fire flower, complete with ranch dressing for dipping!
Luigi Pizza Pinwheels - these were crescent rolls with pizza sauce, cheese and diced peperoni rolled up, sliced and baked. A huge hit with the kids and adults and so super easy.
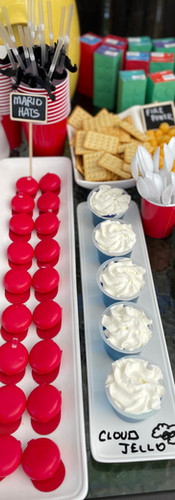
Cloud Jell-o - blueberry jell-o cups with whip cream topping!
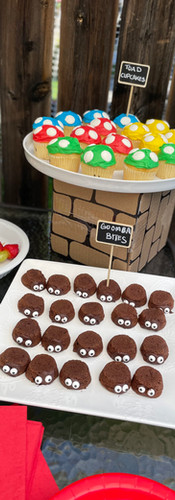
2-bite Goombas - we used melted chocolate to attached candy eyeballs to our favorite 2-bite brownies turned upside down to look like goombas.
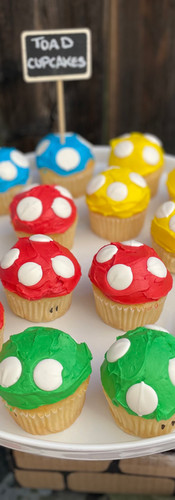
Toad cupcakes - I didn't have time to bake this year, so I arranged for cupcakes from a local bakery with red, green, yellow and blue frosting. I smoothed out the frosting and Wells helped me add white candy melts on top for the mushroom dots. I used a black sharpie to draw eyes on the cupcake liners.
Mario hats - babybel cheese with red paper brims glued on the bottom to look like Mario hats!
Lego juice boxes - These were cut out paper folded around the juice boxes to look like bricks!
Other snacks to round out the table included: fuzzy peaches (princess peaches), malted chocolates (bob-ombs), mini eggs (yoshi eggs), cheese balls (fire power), crackers & lots of ice water ('Wario Water'). Beer and cocktails were set in ice inside one of the large warp pipes.
I hope these ideas are helpful for any Mario-themed parties you have planned! Please leave any questions or comments below and reach out anytime on my website or social media pages.
xo


















What a fun looking time. I did a similar themed party for my grandson years ago. Mario theme with all of his friends and costumes. We had cake and presents and rented a bounce house in the back yard.
How did you get babybel to stick to the paper? I tried multiple glue but it wont stick!